I wanted to note that this guide was compiled by one of our Kin officers in Dances with Ents called Robrelloth, thanks to him this guide is available.
Ambor
The new panel Epic Battles is accessible in the main system menu on the far left of your UI. It can also be accessed by typing Shift+B. This new panel is broken into 3 tabs on the left-hand side.
Tab 1 – Road to Battle
Road to Battle is a Map of Helm’s Deep with five numbers on the map. You select the number and then on the right-hand side it explains the instance lets you select the group size and then either to Launch or to Queue the instance. If you select to Launch you will be thrown into the queue and then launch the instance with the number of people you already have. If you select Queue, you will enter the queue and wait until others wish to do this instance at which point it will launch. Each battle must be run in numerical order in Solo/Duo to completion before you can access the next battle. On the bottom you see 4 medals with progress bars and next to each bar a button. These bars are the Bronze, Silver, Gold, and Platinum rankings you have gotten so far towards Jewelry of each type. The button next to them allows you to ‘forward’ your progress from the bar you are on currently to the next bar to advance it more. You are only able to forward your bronze and silver reward progression. Platinum rewards must be earned on their own merit.

- Helm’s Dike – This instance can be run Solo/Duo or Fellowship
This is a battle that takes place ahead of Helm’s Deep itself. It is a dike set up north of Helm’s Deep itself. The instance is broken up into 4 segments. The West, The East, The Center and then the Gate/Stables below. The center has a wooden gate that bridges the Western and Eastern Sides of the Dike. A river flows under this gate as does the road south to Helm’s Deep. There is a rope on the western edge of the upper gate that leads down to the road below and a rope at the bottom that leads back up to the top of the gate. This instance has 3 phases the first two are East and Western attacks and the third is a Central attack. The Central attack uses the two closest ingresses, one from East and one from West, in addition to a side quest on the road. Of special note to help you get around in this instance you can ride your normal Horse or Goat.
- The Deeping Wall – This instance can be run Solo/Duo or 12 Man Raid.
This battle takes place mostly upon the Deeping Wall itself. To the West you have the gate room where some side quests take place. To the East you have a Tower with a Catapult on top and under it is another guard house where another side quest takes place. In the guard house there are also stairs that lead down to the Deeping Coomb there are more side quests that take place down there as well. Up on the wall section is where most of the instance takes place. Each section of the Wall has 3 Rock Fall defenses that you can arm, load, and use to put damage spots below the ground to harm mobs before they climb up the wall. Periodically ladders and grappling hooks are placed onto the wall by the attacking orcs. You can click on or use Delete U to then disable/kickoff the ladders and grappling hooks. As long as ladders and grappling hooks are on the wall the orcs can continue climbing up and overwhelm the defending Rohirrim and yourself. Off in the distance you can see the organizing orcs and their siege weapons their own catapults. You can use your own defenses to take them out. If you don’t the catapults will rain down aoe damage upon you that hurts a lot. When this instance reaches its conclusion the western section of the wall explodes, if you are on it, you will be defeated but will still complete the instance.
- The Deeping Coomb -This instance can be run Solo/Duo
This battle takes place in the Deeping Coomb which is the section of land protected by the Deeping Wall only now there is a huge hole in it where orcs will flood in from. There are two battle fronts on the western side of the river and one on the eastern side. The waves of mobs in the first phases will go for one or the other (typically the eastern side first) and the 2nd phase will switch to the other side (western side). There is a bit of a lag between when they call for the front switch and when the mobs will change to attacking the other side. Until then you have to continue to cover the 1st front. When it is called back to fall back to the Hornburg or Glittering Caves this is the end of the battle. Of special note to help you get around in this instance you can ride your normal Horse or Goat.
- The Glittering Caves – This instance can be run Solo/Duo or 3 Man
This battle takes place within the Glittering Caves. You start off in a central hill within the caves with all the women and children of Rohan. There are two paths down, one that leads off to the east and one more to the south and then west. Both paths circle around the central hill leading to the two-man fronts to the NE and NW of the central hill. Each of these is manned by Gamling or Gimli as well as the Rohirrim. In this instance you fight off the waves at those locations before falling back more to two secondary battle fronts again manned by Gamling and Gimli, respectively. You hold these points and do the side quests until the instance is completed. Of special note to help you get around in this instance you can ride your Goat.
- The Hornburg – This instance can be run Solo/Duo
This battle takes place upon the outer wall of Hornburg. You start off on the wall directly north of you is the Gatehouse. Inside the gatehouse is a door that will lead you down into the Lower Gatehouse where the main gate is. On the top of the gatehouse are two giant ballistae guarding the main entrance to the Hornburg. Durectly south of you is the bridge leading to the inner sanctum of the Hornburg. Going down the stairs to the south will lead you to the wall connecting two towers. It is between these two towers and this segment of wall where all the fighting will take place. You have a rope that allows you to get back up on top.
Tab 2 – Promotions
Promotions is a complex tab that is all about the three roles or professions of the Big Battles. You have Engineer, Officer, and Vanguard. On the left you see your general progression of Bonuses a little bit like our Class Trait capstones, the more traits you put into one of the roles the more bonuses you obtain. Then next to that on the right are the trait lines for the three roles. On the bottom you see how many promotion points you have earned that you are able to spend on the different roles. Next to that on the right we have the Re-Specialize, Cancel and Apply buttons just like for our Class Traits. On the far Right we have 5 preset specs that you can obtain just like with our Class Traits and Mounted Combat Traits. If you are Free to Play only 1 will be unlocked, if you are VIP you will have 2 unlocked with a maximum of 7.

The Engineer – The Engineer focuses on utilizing interactives and siege equipment within the space to defeat their enemy. The majority of his promotions focus on improving the efficiency with which he performs his actions and unlocking new options for utilizing and upgrading siege weaponry. Engineers also gain the ability to place a variety of traps that can damage or hinder your opponents.
The Officer – The Officer focuses on direct and supporting the Rohirrim in battle. You can issue orders to tell the defenders to heal, boost their damage, change their target priority or swap stances. Officers also gain the ability to place banners that can aid nearby engineers and vanguards. As you apply more points into the trait tree the power of your commands increases and their cooldown decreases.
The Vanguard – The Vanguard focuses on directly engaging the enemy before them. As you kill enemies you gain access to new skill and abilities to unleash powerful area-based effects and damage. When you fall in battle those around you will be inspired by your loss and fight harder.
For Promotions Free To Play accounts will have 1 preset available to them free. VIPs will have 2 presets available to them for free. There are a total of 7 presets that can be obtained. Each preset cost 100 Mithril coins.
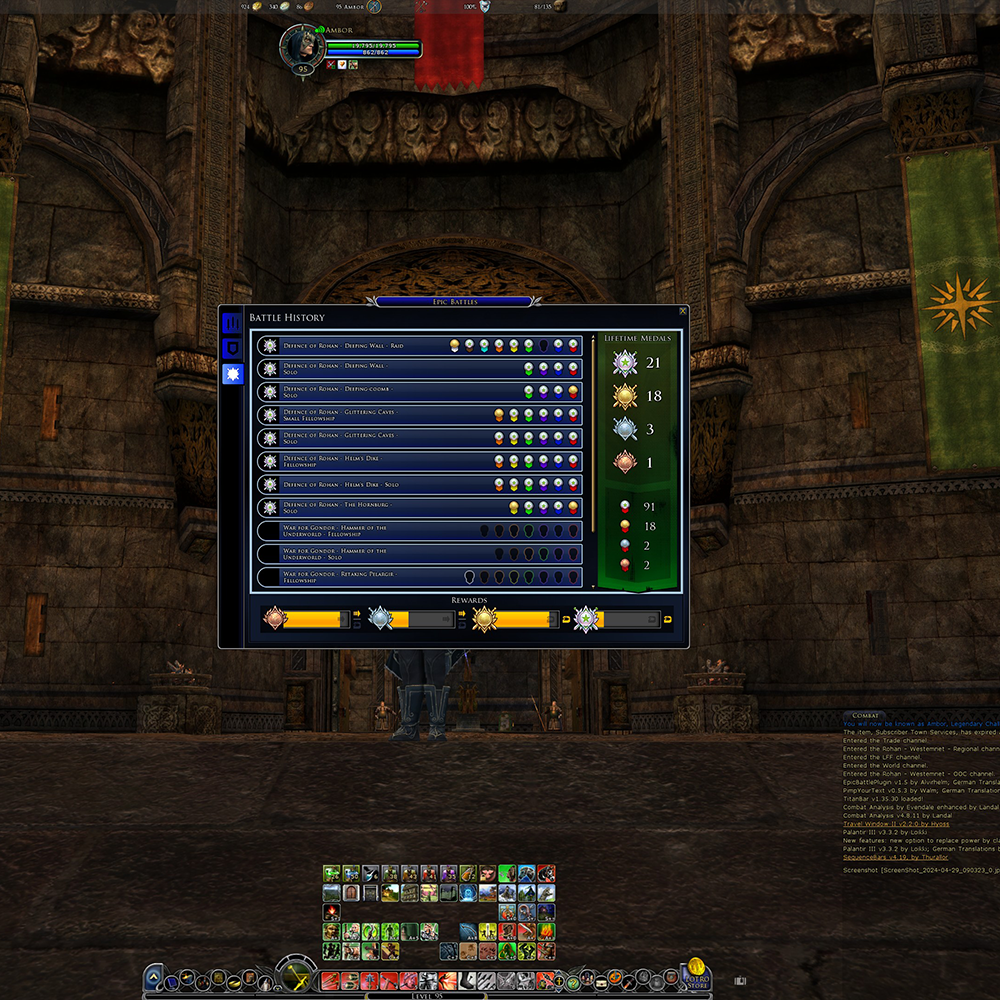
Tab 3 – Battle History
Battle History shows you how many medals you have earned on the far right. On the left it lists off each version of the Big Battles that exist Solo, Small Fellowship, Fellowship and raid. It also depicts the rank you completed of each of the side quests within the instance. You are able to click on each of the instances to bring up more detail about them and see exactly which quests you have completed, with what ranking and suggestions on things to do to get a higher ranking. On the bottom you see 4 medals with progress bars and next to each bar a button. These bars are the Bronze, Silver, Gold, and Platinum rankings you have gotten so far towards Jewelry of each type. The buttons next to them allow you to ‘forward’ your progress from the bar you are on currently to the next bar to advance it more.

Rewards

As was stated before, the rewards for these instances when it comes to gear is obtained on a merit basis. On the bottom of the Battle History and Road to Battle tabs you see 4 medals with progress bars and next to each bar a button. These bars are the Bronze, Silver, Gold, and Platinum rankings you have gotten so far towards Jewelry of each type. The buttons next to them allow you to ‘forward’ your progress from the bar you are on currently to the next bar to advance it more. For every medal of a certain kind, you obtain it fills the meter up of that medal type. All rewards are Bind on Acquire.
- Bronze Rewards are Common Yellow role specific pieces of jewelry.
- Silver Rewards are Purple role specific pieces of jewelry.
- Gold Rewards are Teal role specific pieces of jewelry.
- Platinum Rewards are Class Specific Teal and Gold pieces of jewelry with set bonuses.
The speed at which the meter fills up is determined also by the size of the instance you are in as well as the number of side quests you complete. The breakdown of how they affect the rewards meters are as follows

Some Solo/Duo instances have 2 side quests that come up each time you run it while others have 3. If they have 2 you get 2 points from the main quest. If you complete 3 then 3 points.
The first time you obtain a specific medal on a quest your meter will also go up 5 additional points beyond the normal worth of that medal. After that though you will only get the normal worth of that medal.
A detailed example:
You do Helm’s Dike for the first time ever. You get bronze medal on the first quest, Gold on the second and third, Silver overall. This is what you get:
Bronze Reward Bar advances 26 points: 1+5 for the first quest, 1+5 for the second, 1+5 for the third, 3+5 for the main quest. You get a Bronze-level jewelry piece and gain 7 points extra.
Silver Reward Bar advances 20 points: 0 for the first quest, 1+5 for the second, 1+5 for the third, 3+5 for the main quest. You get a Silver-level jewelry piece, and the Reward Bar resets to 0.
Gold Reward Bar advances 12 points: 0 for the first quest, 1+5 for the second, 1+5 for the third, 0 for the main quest.
Platinum Reward Bar does not have any counts.
Imagine you return to this battle tomorrow and get the same Medals. Your rewards will be:
Bronze Reward Bar advances 6 points.
Silver Reward Bar advances 5 points.
Gold Reward Bar advances 2 points.
Platinum Reward Bar does not have any counts.
Merit
Ok since there is much talk wondering exactly how this works for gaining points to spend on the Promotion trees this is how it is.
Each Medal is worth 1 promotion point.
When you do the quest for the first time and get that level of medal for the first time you get the points for the medal you obtained and any medal lower than that one.
Example if you get a Silver for the first time you will get 2 points. If you then went in again on the same quest and you get Gold for the first time you will get 1.
Any time after that whenever you obtain a medal you had previously obtained you will get no new points.
So, Every Quest is worth all of 4 Medals, both Side Quest and Main Quest.
This is the breakdown of how points are distributed.

Promotions
So, for now, if you only do Solo/Duo you can only obtain 148 points. If you do every sized space, you can obtain 280 points but currently you can only use 246 of those. The 3 man, 6 man and 12 main numbers will change over time as they are likely to add more 3/6/12 mans to the existing battles.
Something very important to know is that as you unlock trait triers, they will unlock all 3 Promotion types. So, you can be a Rank 3 Engineer and have access to deeper traits in Vanguard and Officer. This is very handy for obtaining better ability in the other lines. For example, Engineer has Crank, Extinguish, Repair, Build all at higher tiers of traits. Officer has their Heal skill cooldown, power all at different tiers as well. Vanguard has a run speed boost at a deep tier. It is important to note though that you can put points into any of the traits that have been unlocked but that does not mean you have the ability to use the abilities associated with those traits until you have the correct Promotion Rank.
General Tasks for All Battles
This is a list of tasks that anyone is able to do within the battles.
Engineering Tasks
Anyone can help out with these different functions, but it is the Engineer who has special traits that will enable him to be faster at them.
In the Engineer section I will detail these tasks in more depth.
🔸 Building Barricades
🔸 Building Ballestas
🔸 Building Catapults
🔸 Aim/Load/Crank/Fire Ballista and Catapults
🔸 Extinguishing Anything Burning
🔸 Rebuilding Anything Damaged
🔸 Disabling Explosives
🔸 Knocking off Ladders and Grappling Hooks.
Multiple People Can Help at Once
That is if you are for instance Building if multiple people select this it will get accomplished faster. This is really helpful for Ladders/Grappling Hooks, Disabling Explosives, Extinguishing Fires, Repairing, Cranking Ballista/Catpults, Aiming Ballista/Catapults, Upgrading devices.
While person is Loading another can be Cranking/Aiming/Upgrading. You cannot however have one person Aim Up while another Aims Left/Right/Down.
Officer Tasks
Anyone can help out by issuing orders to a Commander, but it is the Officer who has special traits that will enable him to have both stronger orders and shorter cooldowns on his orders. In the Officer section I will detail these tasks in more depth.
Issuing Heal Orders to Commanders
Issuing Haste Orders to Commanders
Issuing Damage Orders to Commanders
Issuing Armour Orders to Commanders
Engineer
The role of the engineer varies based on the battle you are in. In some of the instances you will have multiple roles that you need to fill. The general roles of the Engineer are as follows.
Rank 0
Barricade Setup and Maintenance.
In most instances the barricades will not have been set up. You will need to either pick up a crate to place it or you will see a red outline of a barricade that needs to be built. When you are placing a barricade down from a crate the direction your character is facing will determine what way the barricade faces. You will want to place it so that enemies will travel through the barricade for the longest duration.
Sappers when they come in on waves are going to target barricades as one of their main targets. When they are inducting it means they are about to set it on fire. If you can interrupt them. Otherwise, while a barricade is on fire it will take constant damage until it is Extinguished. You will have to click on the barricade and use the Extinguish function to put it out and then Repair to fix it.
Catapult/Ballista Setup and Manning.
Most Catapults and Ballestas will need to be built before they can be utilized.
The Catapult needs to be Loaded and Cranked before you can see where your target is. With the Catapult you can then crank more to increase the distance. You can also Aim Left and Right to change the position of your target.
The Ballista requires only a Load and a single Crank before you can see where your target is. From there you Aim Left, Right, Up and Down to change the position of your target.
Ladder/Grappling Hook disabling.
On any battle on the wall, you can control the flow of battle some by knocking down Ladders and Grappling Hooks. This cuts down on the number of foes that can climb the wall. Ladders have been observed to be the only means for Commanders to climb the wall.
Explosive Disabling.
Sappers and other Orcs inside quests will place explosives down at different goals. It is important to disable this quickly. There are multiple sizes of explosives. The larger the size the longer it takes to disable. These larger explosives need multiple people to disable them.
Rank 1

Able to pick up Placeable Barricades
Able to Place Traps. That is the Bear Trap, Caltrop and Tripwires. Engineers can obtain traits that will shorten the cooldown, increase the number of times a trap triggers and increase the damage done by the different traps. Traps are very handy for slowing foes and assisting in damaging them. A trap placed where a barricade is is quite handy. Bear Traps deal damage to enemies and make them more vulnerable to attacks.
Caltrops will stick in enemies’ feet and continue to damage them.
Tripwire will knock down enemies making them more vulnerable to attacks and easier for allies to land critical hits on. If an enemy has stun immunity on them this will not affect them.
Able to Upgrade Armour on Siege Weapons
Rank 2
Able to load Heavy Catapult Shells.
Grants +5% Contribution boost to all engineering activities. That is you get 5% faster at everything.
Rank 3
Able to place boxed up Catapults and Ballestas.
Able to Upgrade the Crank speed on Siege Weapons.
Able to Add Demoralizing Powder to Catapult Shells.
Rank 4
Able to Load Grapeshot Catapult Shells.
Able to Add Leeching Powder to Catapult Shells. This will leech morale from the targets over time.
Grants a 15% Contribution boost to all engineering activities.
Rank 5
Able to load Triple Catapult Shells. This a multi spread shell that hits 3 places.
Able to Upgrade Damage of Siege Weapons.
Able to Apply Slow Powder to Catapult Shells.
Rank 6
Able to load Spread Catapult Shells.
Able to Upgrade Distance of Siege Weapons.
Able to apply a rending Powder to Catapult Shells.
Grants a 30% Contribution boost to all engineering activities.
Officer
The role of the officer is standard regardless of what battle you are in. The roles are as follows.

Issuing Heal Orders to Commanders. Anyone can order a Commander to Heal themselves and their Soldiers. But the Officer Promotion Tree has traits that will shorten the cooldown and increase the power of these orders.
Issuing Haste Orders to Commanders. Anyone can order a Commander to command their Soldiers to fight with Haste. But the Officer Promotion Tree has traits that will shorten the cooldown and increase the power of these orders.
Issuing Damage Orders to Commanders. Anyone can order a Commander to command their Soldiers to deal higher Damage. But the Officer Promotion Tree has traits that will shorten the cooldown and increase the power of these orders.
Rank 1
Order Armour Stances. You obtain the ability to order Shield Stance, Siege Armor and Arrow Volley Armour stances. This can be handy as there are times where your soldiers will take more damage based on enemies, arrow volleys or enemy catapults.
Rank 2
Set Soldier Target Priority. You obtain the ability to set target priority to Archers or Warriors.
Able to Set Vanguard and Engineer Banners down. These banners will enhance everyone’s Engineering or Vanguard contributions. You can also trait to enhance these banners and shorten the cooldown between banner placements.
Rank 3
Set Soldiers to Two Handed Weapons Stance. This is a marked increase in their damage output. It is very good to place on Commanders where you need extra help.
Set Soldier Target Priority. You obtain the ability to set target priority to Sappers or Berserkers.
Moderate Initial Heal Order Power Increases.
Rank 4
Set Soldier Target Priority. You obtain the ability to set target priorities to Commanders.
Increase Range you can deploy your Banners.
Increase Duration of Heal, Haste, Armour, and Damage Orders by 5 seconds.
Rank 5
Increase Area of Effect of Banners.
Adds Heal to Corruption Removal.
Increase Duration of Heal, Haste, Armour, and Damage Orders by 10 seconds.
Rank 6
Moderate Initial Heal Order Power Increases.
Adds an Initial Heal to Banner placement.
Increase Duration of Heal, Haste, Armour, and Damage Orders by 10 seconds.
Vanguard
Rank 0

Once you spend points into one of the traits you have access to kill streaks and the benefits of the trait bonuses and skills you have selected. You spend killstreak points to utilize your killstreak skills on the left hand side of the UI. Your selected effects on the right hand side of the UI will trigger upon each trigger event unless they are on cooldown.
You need to have put 1 promotion point into one of the following five traits as well, in order to get the effect that grants the pips (probably not communicated as well as we could on this part) :
Killstreak Max
Killstreak Skill Strength
Killstreak Skill Duration
Killstreak Skill Target Count
Killstreak Skill Cooldown


Rank 2
Able to use the Simulating Loss Hero’s Defeat upon your death and Eye for an Eye Soldier Defeat Effect.
Rank 3
Able to use the Enfeebling Cry Killstreak skill.
Able to use the Motivating Fall Hero’s Death effect and the Serrated Recruit Defeat Effect.
Hero’s death effects also have an increased duration.
Rank 4
Able to use the Galvanizing Defeat Hero’s Death effect and the Rejuvenation Soldier Defeat Effect.
Have a chance to refund half the Killstreak spent to trigger a Killstreak skill.
Hero’s death effects also have an increased duration.
Rank 5
Able to use the Piercing Road Killstreak skill.
Able to use the Fleetness Recruit Defeat effect.
Have a chance to refund all the Killstreak spent to trigger a Killstreak skill.
Hero’s death effects also have an increased duration.
Rank 6
Able to use the Stunning Bellow Killstreak skill.
Able to use the Inspiring End Hero’s Death effect and the Entrenchment Soldier Defeat effect.
Increase to the area of all Killstreak skills and Hero’s death effects.
Hero’s death effects also have an increased duration.